PGC2019: Lady Eyja Gunnarsdottir’s Games Box

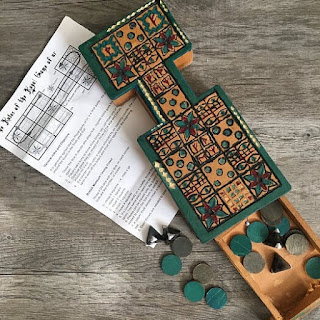
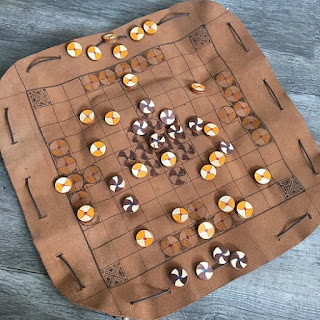
Lady Eyja shares a box of period games, created as a gift of Largess.  She describes it in her own words:

“I have created a Games box featuring the game of Tablut. This is a version of the Tafl games played throughout the Norse world. On the other side of the lid is nine mens Morris, which was also known to be played in the same era.
This was created as a Largess gift, as I wanted to create something fun and useful for a Norse persona. The recipient’s heraldry is yellow and red, and is reflected in the board and playing pieces. The box and playing pieces were purchased then hand painted.

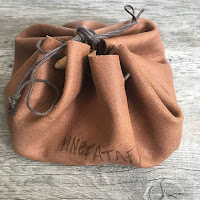
I created a small linen bag for the playing pieces which has a fingerloop braided drawstring and the owners device embroidered onto it.

There is plenty of space in the box for more games to be added over time.
Something a bit different to what I usually do, but now I am keen to make my own games collection in the future.”

PGC2019: Lady Melisande de Massard’s Mittens & Socks

Lady Melisande enters a cozy pair of mittens and a snugly pair of socks in the category “With silken coats, and caps, and golden rings, with ruffs, and cuffs, and farthingales and things“. 

“When camping I find it most convenient to clothe myself in Norse garb – comfortable, easy to work in and easily laundered!

Some of the members of the Heorot household were planning a household event where we would spend the weekend camping in a living history style. Originally planned for an Easter weekend I thought to myself ‘this could be a little chilly – what I need are some mittens and socks!!’. 

I purchased some pre-spun, natural wool, and with a wooden needle and the kind assistance of Lady Katherine (who showed me the Coptic stitch and how to get started), I first tried my hand at a pair of mittens. The first mitten is a little mis-shapen but I was a lot happier with the second which is much more evenly shaped. I was surprised at how quickly they made up and, encouraged by how the mittens turned, out I purchased more wool and got started on a pair of socks.

Looking at images of extant finds, and reproductions (and again with help from Lady Katherine when it came to the heel!) I gave it a go. Sir Callum had given me the gift of a beautiful new needle made of antler – such a different experience using that over the wooden one! I love it! I would like to have used a contrasting coloured wool for the last few rows around the ankle (as per some of the extant finds) but not having any suitable wool at the time I shall leave that for another pair. The socks are so comfortable and the mittens lovely and warm. 

We had to postpone the camping weekend but I’ll be ready to go when we set another date – I just hope it’s not in mid-summer!”

PGC2019: Lady Eyja Gunnarsdottir’s Nalbound Mitts

Lady Eyja submits the first entry in the new ‘Sweet are the uses of adversity‘ category.  She writes the following to describe her fingerless gloves:


“I decided to use my ‘plague time’ to learn the Nalebinding Oslo stitch. This may have been a skill my persona learnt around the fire as a young girl, and taken up again when time rich but resource poor as it only requires wool.

I have used a bone needle, 100% wool, and a youtube video – https://youtu.be/UEJywXIluhk 

Initially I found it tricky to get a nice tension without tearing the wool, but it was relatively easygoing once that was sorted. The fingerless gloves were made in the round, not following any specific pattern other than trying it on as I went.

The result is soft, warm, and stretchy with a neat pattern. The wool itself felts well at the joints but is rather fragile, so in future I would use something sturdier for a hard wearing piece such as mittens.

In service,
Eyja Gunnarsdottir.”

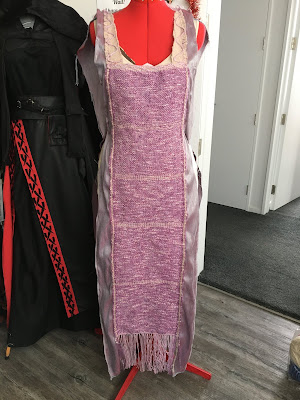
PGC2019: Solvi Gyldersdotter’s Hand Woven Front Dress

Solvi shares a hand woven front dress that her persona may have worn in the category “with silken coats, and caps, and golden rings, with ruffs, and cuffs, and farthingales, and things.”

Materials and techniques:
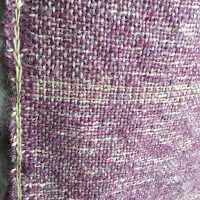
Using a rigid heddle loom and some wool given to me I wove a front panel of a dress.

The rest of the dress is fabric that was also given to me. My challenge to myself was to make a wearable garment with that fabric and since the fabric wasn’t enough I decided to have a go at weaving a front panel.

Persona Inspiration:
My persona is from the early Viking age.

Solvi enjoys weaving and exploring possible fashion looks and enjoys wearing her creations. She is a creative type and often wears out of the ordinary viking fashion making the locals talk – “Well that isn’t traditional” and “That’s different”

PGC2019: Solvi Gyldersdotter’s Shoes

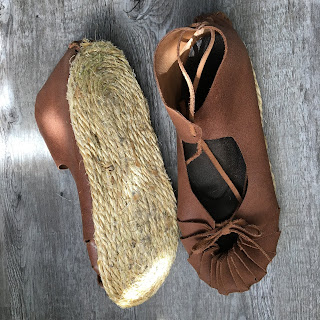
Solvi has two pairs of shoes to enter in the category “with silken coats, and caps, and golden rings, with ruffs, and cuffs, and farthingales, and things.”  In her own words:

Iron age shoes – for summer
Viking shoes – for winter

Materials and techniques (how was the item made and what materials were used):

My iron age shoes and Viking shoes were made using

  • leather, 
  • hand 
  • leather hole punch, 
  • hand stitching, 
  • sisal rope and 
  • shoe glue.

Based on the pictures I have seen on pinterest while doing a quick search for viking/middle age shoes.  These shoes are based on those looks. 

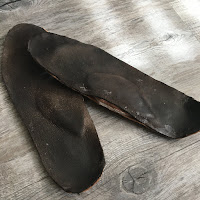
Because of my high arch I also made myself some arch supports with leather and leather leftovers. Custom made is so awesome.

I added the rope soles as the leather was a bit slippery on a lot of surfaces and the last thing I wanted was to end up on my bottom at events. 😉 and the rope soles add grip as well as helps the shoes last a little longer.  Sisal rope is hard wearing. That technique of adding rope soles is used in the 13th century. Its origins can be traced to the Occitania and Catalonia areas of the Pyrenees on the Spanish and French border. Ref: https://startupfashion.com/fashion-archives-a-look-at-the-history-of-espadrilles/  As most things ended up on the silk road I thought that these type of “technologies” would have been combined sooner or later, in true viking form…. Not necessarily documented in texts and in visual arts which we often refer to.

I have tested both these pairs of shoes on most surfaces…. Tarseal, shingle, gravel, wood walkways, carpet, lino and grass. All but lino are great and safe to walk on – Lino is still slippery but I could add some silicone to the bottom if I am too worried about it.

Persona Inspiration (when and where is the persona from, and how might they have
used / experienced this item):

My persona is from the early Viking age.

Solvi’s husband is a merchant on the Silk Road, is away for many months, and often brings home goods for the love of his life. Sometimes in the form of leather, fabrics and other useful items.  Solvi needs shoes for both summer and winter to keep her feet protected from the elements. So she made these shoes for her own comfort to wear. Solvi likes combining different techniques to improve comfort, safety and practicality…. Sometimes looks…. May be one day those plain winter shoes could be altered with a pretty design on the top, when she figures out how, and when she has the time.”

PGC2019: Solvi Gyldersdotter’s Games

Solvi enters two ancient games she has made in the category of “What revels are in hand? Is there no play, To ease the anguish of a torturing hour?”  Solvi has this to say of her creations:

“Project

Royal Game of Ur and Hnefatafl

Both Games from ancient times. Largely found on the silk road and in viking homes.

Materials and techniques: (how was the item made and what materials were used):

Royal Game of Ur:
After watching a video on youtube by the British Museum I was intrigued by the game named above. I searched for a copy to buy but unfortunately everywhere was sold out.  So after i was given some wood (MDF) i had decided to give wood working a go and make one.

My version of the Royal Game of Ur is made by hand, sawn and carved and coloured (with inks) the game pieces are wood circles that I found in the cheaps shops ($2 type ones – laser cut circles) and the dice were ones bought and I altered the according to the dice that were used on the video. https://www.youtube.com/watch?v=wHjznvH54Cw As often as I do I did add some runes for my viking persona… a personal touch.

Hnefatafl:

Being more curious and loving board games I searched up more medieval games and came across a viking game. I saw it played on a program “vikings” (on netflix) looked it up and it was an actual game! So excited I started planning on how I was going to make it. I was given some leather so went ahead and made a board that converted into a pouch to hold all the pieces.

The Board itself is a leather round piece drawn together with a wooden toggle (wooden button) and waxed cording. The pieces once again were glued together laser cut circles from the shop. The board was drawn on with permanent ink pens.

Both games were recently played during a down time at Golden Flight 2019 by various people.

Persona Inspiration:

My persona is from the early Viking age.

Solvi’s husband is a merchant on the Silk road, is away for many months and often brings home goods for the love of his life.  Solvi when not weaving or sewing goods to sell or give to the local populace, enjoys a good board game with  close friends in the evenings.”

VPC2017: Meisterin Christian’s Skjoldehamn Hood

This hood is presented for the categories The Neck Best Thing, Cover Me, One Metre Material Project (wool fabric), Counting (on) Sheep.

Meisterin Christian says:

I anticipated needing some additional warmth around my head and neck for the Fiery Knights event, but I didn’t have anything as I’m not a fan of hats or headwear.  I decided the most appropriate period choices seemed to be the Hedeby hood or the Skjoldehamn hood (whether or not the Skjoldehamn hood is Viking or Sami remains a matter of debate, however as both Viking and Sami occupied the area at the time (late Viking-period), some concordance may not be out of the question).  I wanted the hood to go with the red wool Viking coat I made for cold nights at camp, and remembered that somewhere I had scraps of that fabric.  Upon excavating my fabric stash, I found I had two strips of the fabric, each about 90x30cm.  This ruled out the Hedeby hood, but was pretty much the same size as the fabric for the Skjoldehamn hood. I decided to make the hood as close to the original as possible to the original to better understand how the period garment was constructed and might have been worn.  The construction of this hood is not quite as simple as it may seem, however I could easily have completed the garment in less than one day if I’d had the opportunity to do so.


The original hood is comprised of a square of wool about 60×60 cm, which was folded in half and sewn together along the top and down the back (of the head), with a slit at the lower front and open seam at the lower back into which square gores approx 30×30 cm were inserted, and the front of the hood was slit open for the face opening.  Since I had two strips 90×30 I had the right amount of fabric, but the hood had to be sewn together (rather than slit open) at the front as well as the back.  The person who had worn the original hood was probably an adult around 5 ft high (just a few inches shorter than me) so I thought I’d make the hood the same size, but with slightly smaller seam allowances.  The finished hood is snug and comfortable but not tight, and covers the top of my shoulders, chest and back just fine, so the sizing seems good.  I do find it a little difficult to lower and raise the hood but that is largely due to my ponytail.


I constructed the hood as close to the original as information allowed, e.g. all the seams were sewn from the outside, by turning the seam allowances in along the top and back of the head of the hood, and along the gores and sewing the outside of the seam with in an overcast stitch.  The original was described as a non-decorative stitch; I used some wool sewing thread that was a close match for the fabric colour so the resulting seam was definitely not decorative, and mostly invisible. All the seams in the hood other than along the top of the head were then opened out, and stitched from the outside with an alternating, slightly diagonal running stitch which was also non-decorative.  This essentially flattens out the seam allowances and holds them flat on the inside of the hood.  This is an effectively way to ensure they don’t stick out and catch on the wearer’s hair.


Along the top of the head of the original hood there are several rows of running stitch that go across the top of the head, and then “dip” to follow the curve of the back of the head, creating what some call a “cockscomb” effect.  It has been speculated that this was intended to make the hood sit better, and further forward on the head.  I replicated these stitches, although I did not take the final line of stitching so deep at back as the original so as to accommodate my topknot ponytail.  This “cockscomb” did indeed seem to keep the hood more snug and more forward, but this might just have been because it fit closer around the head.  We will never know if this was intended in the original, or was this originally done to e.g. “downsize” the hood to fit the specific wearer.


I had to depart from the original construction technique in needing to overcast all raw edges (other than the top seam which was enclosed inside the lines of running stitch) as my fabric was quite “sleazy” (thanks to Baroness Eleonora for this weaving term meaning a ” fabric with a very loose weave which has a tendency to come apart at the slightest provocation”).  I used a simple overcast stitch again in the same thread so this is largely inconspicuous.


At the face opening of the original hood a narrow seam allowance was turned in, and a non-decorative cord (i.e. not a contrasting colour) was couched around the edge of the seam allowance of opening on the inside with a decorative couching (i.e. contrasting) stitch.  The original decorative stitch changes colour at one point, as if the maker ran out of the first coloured thread.  I choose to use one decorative colour (in this case the pale gold wool that was used to decorate my coat) as it would otherwise look odd to modern eyes.  It seemed a shame to miss out on the opportunity to use a decorative cord around the face as well (other garments in the original outfit have some highly decorative touches, and the hood seems somewhat under-decorated by comparison), but I found in my stash a cord of a slightly different red wool which I’d made for another project.  This was then subtly decorative, hopefully satisfying both me and the original.


The lower edge of the original hood was not folded under, merely overcast along the cut edge.  My sleazy fabric was not stable enough to do this, so I had to fold under a small hem.  One source says the original hem was overcast with a stitch that was “parallel to the thread”, so I used a simple blanket stitch.  In the original this overcasting is not decorative, but I used the pale gold-coloured wool again to match the decoration on my coat as by this time the hood was looking a bit plain and not very “matchy” with the coat.  I’m still not sure how I feel about this and may yet change that.


The original hood has two cords attached to the outside, described as being placed “under the ears”.  There is speculation among archaeologists and reenactors as to what these cords are for (e.g. pulling the hood closed around the face, pulling it open by tying at the back of the neck / head) but it was noted that there is little wear apparent so it is assumed that the cords on this particular hood were not much used.  I did have some cord left over from my coat which just happened to be the right length for these.  I pinned the cords on to the hood and tried the hood on, pulling the cords both forward and back.  I decided I didn’t really have much need to pull the hood closed (no snow storms expected) or keep it open (I preferred to pull it down around my neck for temperature control and to avoid impeding my peripheral vision), and since the cords really annoyed me dangling either side of my head I took them off and put them in the naughty corner, from where they may or may not be attached at a later date.

VPC2017: Lady Melissa’s Tablet Woven Belt

VPC2017: Lady Melissa’s Tablet Woven Belt

Lady Melissa presents this tablet woven belt for the categories  Out of Your Comfort Zone, String Theory, and Counting on Sheep.

She says:
This tablet-woven belt was made using motifs from historical Finnish tablet weaving, which uses more threaded-in patterning and less brocade than historical Scandinavian pieces. The outer yellow strands were hand-spun from raw fleece and dyed yellow with rosemary. The thicker blue was handspun as well. The rest was commercial embroidery wool. The colors are the same as Melissa’s heraldry. This was an interesting and challenging project for Melissa, as it was her second attempt at tablet weaving, and much longer than the previous (failed!) project.