PGC2019: THL Joana de Bairros’s 1520s Portuguese silk dress

Category: With silken coats, and caps, and golden rings, with ruffs, and cuffs, and farthingales, and things.  A garment your persona may have worn.

Purpose:  

I bought some beautiful red silk/wool blend and, as there are many red Portuguese dresses in the pictures of the 1520s, I thought that this was a good plan to keep up with the fashions!  I also wanted to try something in keeping with the St Auta altarpiece dresses.  I did not want to make one specific dress but incorporate a number of the features seen in this painting.

Martyrdom of St Ursula and the 11,000 Virgins, Master of St Auta


 Materials used
:

  • 7m silk/wool blend
  • Under 1m of cotton/linen canvas and white cotton
  • Shot green/grey/gold silk
  • Lots of gold and wine coloured trim
  • 2 rolls of gold embroidered trim
  • Metal eyelets
  • Cotton tape for hemming
  • Red cord for lacing 

Method:

While my other Portuguese dress has a kirtle underneath I wanted this dress to be worn alone for my personal comfort.  While many of the St Auta dresses appeared to open at the front, for aesthetic reasons I preferred to have the openings at the side back which can be seen in extant Italian gowns, especially Eleanor of Toledo’s.  The Portuguese portrait of Queen Catherine as St Catherine is also clearly laced at the back and this dates from the late 1520s/early 1530s.

I used the pattern for my previous dress and cut out two front and back bodice pieces out of the cotton canvas as interlining. I then cut out the bodice in a piece of thin cotton batting.  I zigzaged these three pieces together to make an inner support layer. 

I cut out a bodice with seam allowance from the red silk and whip stitched this by hand over the canvas layer.  I then whip stitched the cotton lining in place.

Angus put the eyelets in for me but I then couched over them by hand so they blended into the silk and for extra reinforcement.

I sewed the trim around the neckline.  This trim placement can clearly be seen on the back of the beheaded lady in the red dress at the bottom of the St Auta altarpiece and on Queen Catherine’s dress.  The trim matched the colour of the silk perfectly and while I can’t say it is specifically Portuguese it looks fabulous. 

The skirt is four gored panels which are machine sewed together.  This is then box pleated (by hand) to the bodice which is consistent with the Queen Catherine dress. I hemmed the skirt by machining wide cotton bias tape to the bottom. I then folded this inside the skirt and machined in place.  I machined the trim on top of this on the outside of the skirt.  This was because I was running short on time and even as I write this I have had to check multiple times how it was put together so it is not obvious.

I wanted to do sleeves like those on one of the St Auta side panels

These are fairly full with the opening down the back of the arm secured with ties. It is then tied
on to the bodice.  I was fascinated that these sleeves and one in the centre of the 11000 Virgins painting appear to have a turned back cuff that has a wide fancy trim on it.  The sleeves also appear to be lined in a different colour to the rest of the dress.
 

I found a beautiful gold/grey/green silk in my stash which worked beautifully with the silk and trim so I lined the sleeves in that.  

On the turned back cuff I attached some wide gold-work style trim I found at Spotlight and attached the red/gold trim down the opening of the sleeves and used it on the bodice as loops to tie the sleeves to.
 

I cut a two inch strip out of the sleeve lining silk and then, by hand, whip stitched it closed.  I cut this into lengths and attached an aglet to each end of these lengths to make ties.  These I attached down the length of the sleeve opening when I attached the lining. I tied them together to make the sleeves.  I made some others as ties at the top of the sleeve so it could be attached to the bodice.
 

I made a sash out of the same shot silk and put some of the wide trim (from the sleeve cuff) on the ends of it and added gold fringing. 

Verdict:

I love this dress and enjoyed wearing it to the Spring Feast at Gildenwick.  I think in the next version I will alter the cut of the sleeves slightly so the opening is more visible at the back of my arm and the cuff is more parallel to my wrist.  I am enjoying my forays into Portuguese clothing as it is pretty and comfy!  It worked well with my new Portuguese hat too!

Useful links: 

PGC2019: Maestra Isabel Maria’s Vasquina

 Category: With silken coats, and caps, and golden rings, with ruffs, and cuffs, and farthingales and things.  A garment your persona may have worn. 

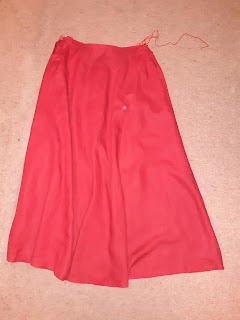
Red linen vasquina

Inspiration:

Both versions of Juan de Alcega’s Libro de Geometria, Pratica, y Traca (1580 and 1589) contain several cutting diagrams for vasquinas, which I interpret to be a skirt that can be worn as an underlayer (ie a petticoat), or as an outer layer for non-court styles.

As I am refreshing my camping wardrobe, and want clothing that will be wearable at increasingly warm Canterbury Faires, I chose to make a linen version of this garment to complement my existing woolen skirts.

Pattern

Alcega has numerous cutting diagrams showing the most efficient way to cut this garment out of different widths of fabric, for example:


Construction

I adapted the pattern from Alecga and constructed it using machine sewing for the initial long construction seams, and hand sewing for finishing the seams, hem, waistband, and eyelets.

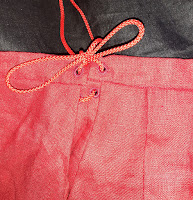
The back is pleated, using knife pleats, into the waistband, while the front is kept mostly flat, for a flattering line over the stomach.  To allow for maximum flexibility of use (and to fit pockets conveniently underneath), I chose to have dual side openings closed with a lace threaded through eyelets.

Red linen skirt side closure with a red cord threaded through 4 hand sewn eyelets, and tied in a bow

Verdict

It is lovely having another linen skirt to wear in warm weather.  Additionally, the dual openings allow access to multiple pockets, but also permit adjustment to suit both what I am wearing, and body fluctuations.

However, I do think it is a bit plain and intend to add multiple stripes of a different red fabric around the hem.

Resources

  • Tailor’s Pattern Book 1589” by Juan de Alcega, translated by Jean Pain and Cecilia Bainton
  • Daily Life in Spain in the Golden Age” by Marcelin Defourneaux
  • A. LaPorta, avocational historian and tailor https://www.facebook.com/alaportahistorian

PGC2019: Christian Baier’s Landsknecht Shirt

Category: A garment your persona may have worn. “With silken coats, and caps, and golden rings, with ruffs, and cuffs, and farthingales, and things.”

White, long-sleeved, linen shirt displayed on a mannequin

Persona period inspiration and use:

Christian has an alter ego as the wife of a Landsknecht (German mercenary soldiers, late 15th and 16th-century).  The making of personal linens for the family was traditionally a task for the woman of the household. 

This shirt was undertaken as a project to while away lockdown.  The shirt needs to be suitable for camping at Canterbury Faire; e.g. a high neck to protect against the sun, and minimal embellishments (e.g. embroidery) in order to be easily and repeatedly laundered.


Design, Materials and Construction: 

There are no landsknecht extant shirts from this period, so the design, materials, construction, and fastening systems had to be extrapolated from extant German shirts from the late 15thC, a German child’s shirt from the early 16thC, and other men’s shirts from the early, mid, and late 16th C.

There are hundreds, perhaps thousands, of representations of landsknechts shirts in prints from the period.  These images show a variety of possible shirt styles and designs (in terms of cut, fastening, embellishments etc), and details can be filled in from extant garments and images of the shirts of elite men e.g. Matthaeus Schwarz.

The linen fabric of this shirt is coarser than the fine linen that would have been used for an elite shirt.  The shirt was hand sewn with linen thread; following the construction of some extent garments, the main construction seams were sewn in thicker linen thread and the finishing / detail work in finer thread.

Given lockdown resources, I had to use linen fabric ties for the neck and cuff fastenings, but these actually worked out better than expected.

Reference: 

  • Patterns of Fashion No. 4; The cut and construction of linen shirts, smocks, neckwear, headwear and accessories for men and women c. 1540 – 1660. Janet Arnold, 2008.
  • The First Book of Fashion; The Book of Clothes of Matthaeus and Veit Konrad Schwarz of Augsburg. Editor(s): Ulinka Rublack, Maria Hayward, Jenny Tiramani, 2015.
  • Textiler Hausrat, Kleidung und Textilien von Nurnberg, 1500 – 1650 by Jutta Zander-Seidel.

PGC2019: Baronessa Isabel Maria’s Manto

Isabel Maria shares her black linen voile manto, in the category “with scarfs and fans and double change of bravery With amber bracelets bead and all this knavery” as an example of an accessory her persona would have owned and used.

A photo of shiny black linen voile folded artistically, with narrow scalloped lace sewn along one edge.

“Both versions of Juan de Alcega’s Libro de Geometria, Pratica, y Traca (1580 and 1589) contain several cutting diagrams for a garment called a manto.  Alcega suggests that such a garment be made of anascote, seda or clarisea.  He also states that the appropriate length is from top of the head to the ankle.  This would appear to suggest it is some kind of all-encompassing veil or modesty wrap.  At this point I asked “how and when was this garment worn in period?”.

Marcelin Defourneaux, in Daily Life in Spain in the Golden Age, describes the wearing of the tapados (or veils) as “cloaks which completely covered them and which were pulled down over their faces, allowing only one eye to peep out.”  He later quotes the Council of Castille saying (during the reign of Philip II) “The custom of women to o veiled has become so excessive that it is now prejudicial to the best interest of the state, for, because of this fashion a father no longer recognises his daughter, not a husband  his wife…” and states that Philip II forbade its use, but without success.  Similarly, he quotes a contemporary writer railing against the practice of folding, and refolding the veil to hide all but the left eye describing it as “a lacivious thing”.

This sounds exactly like the kind of garment any fashionable lady simply must have in her wardrobe.

Pattern

Alcega has numerous cutting diagrams showing the most efficient way to cut this garment out of different types and widths of fabric, for example:

A pattern for a manto from Alcega's pattern book

Construction

Rather than piecing the garment as shown in Alcega, I was able to cut it out of one length, as my linen voile was sufficiently wide, unlike period fabrics.  I hand stitched a narrow rolled hem around the whole piece and then added a narrow black lace to the hem based on a 1590 image found on Indumentaria y Costumbres en Espana.  While the edging adds interest to the garment, it also makes it easier to control the fabric, as it is a simple matter to tell if you are gripping the edge you want, or something else.

Sadly, I haven’t been able to get a picture of me wearing the manto, but here is an image of the finished item.

A half circle manto of black linen voile, edged with narrow scalloped lace, folded into a cone shape

Verdict

This is a pretty and thoroughly inconvenient garment to wear, but perhaps that will change with practice?

Resources

PGC2019: Solvi Gyldersdotter’s Hand Woven Front Dress

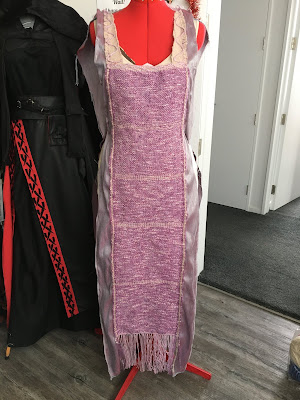
Solvi shares a hand woven front dress that her persona may have worn in the category “with silken coats, and caps, and golden rings, with ruffs, and cuffs, and farthingales, and things.”

Materials and techniques:
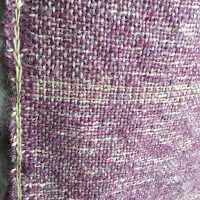
Using a rigid heddle loom and some wool given to me I wove a front panel of a dress.

The rest of the dress is fabric that was also given to me. My challenge to myself was to make a wearable garment with that fabric and since the fabric wasn’t enough I decided to have a go at weaving a front panel.

Persona Inspiration:
My persona is from the early Viking age.

Solvi enjoys weaving and exploring possible fashion looks and enjoys wearing her creations. She is a creative type and often wears out of the ordinary viking fashion making the locals talk – “Well that isn’t traditional” and “That’s different”

PGC2019: Meisterin Christian Baier’s Double Dolphins Brustfleck

As a companion piece to the “M&M” dress, Meisterin Christian enters a beaded brustfleck as an accessory her persona may have owned, made, used, or gifted in the category “With scarfs, and fans, and double change of bravery, With amber bracelets, beads, and all this knavery.”

Persona period inspiration and use:

Christian is a woman of the court in early 16th C Saxony.  Clothing of women of this court are recorded in art of the time, most notably (but not exclusively) in the portraits of Lucas Cranach.
The Brustfleck (Breast piece) or Brusttuch (Breast cloth) is the decorated piece that covered the front openings of clothing, over the linen layer, found in many styles, in early to mid 16thC German women’s clothing, including the clothing of Saxony.

Brustflecks for Saxon court gowns of this period are generally made from brocade and are variously decorated with slashing, pearls, and embroidery.  Pearl embroidery could be in geometric or floral/pictorial designs.

Christian has a number of brustflecks, but not a floral/pictorial one.  I’ve been meaning to do one of these for ages, but I’m fairly inexpert at embroidery, and there were times in the past where obtaining small real pearls was difficult and expensive. This brustfleck was made for the M&M dress (one of the illustrated dresses has a floral/pictorial brustfleck, while the other has a geometric design).

Design, Materials and Construction:

Design: the particular design here is copied from the dress of Emilia in Lucas Cranach the Elder’s portrait of Sibylla, Emilia and Sidonia of Saxony, 1535.  This is a fairly common design, with scrolling flowers and two heraldic dolphins.  I am a member of the Order of the Dolphin of Caid, in fact I received two Dolphins, so this design seemed appropriate.

Materials: the Brustfleck is from made from a gold metal thread and black silk brocade (matching that of the dress guards), interlined with linen canvas, and is lined with fine linen.

Construction: the brocade was interlined with canvas.  The design was simplified and modified to fit the size of the brustfleck and the available pearls.  The design was transferred to the fabric, the embroidery is done in several sizes and shapes of freshwater pearls, and outlined in fine gold cord.  The whole was then lined with linen.

Reference:

  • A number of brustflecks (and their value) are recorded in wills are included in Textiler Hausrat, Kleidung und Textilien von Nurnberg, 1500 – 1650 by Jutta Zander-Seidel, pages 149-150.
  • Portrait of Sibylla, Emilia and Sidonia of Saxony, 1535, Lucas Cranach the Elder.
  • Illustration of Maria and Margarete in the Saxony Stammbuch: Das Sächsische Stammbuch 1546, http://digital.slub-dresden.de/werkansicht/dlf/56803/1/cache.off

PGC2019: Master Christian Baier’s “M&M” dress

Master Christian enters her stunning gown into the category “With silken coats, and caps, and golden rings, with ruffs, and cuffs, and farthingales, and things.” She describes the garment her persona would have worn:

Persona period inspiration and use:

Christian is a woman of the court in early 16th C Saxony. Clothing of women of this court are recorded in art of the time, most notably in the portraits of Lucas Cranach.

I had intended to make this gown originally for Midwinter Coronation in Cluain in 2017, but my modern work commitments became overwhelming and I did not get the dress finished at that time. The gown then spent time in the “naughty corner” waiting on another event for which a velvet, high-necked court gown would be appropriate, which presented itself in the shape of Midwinter Coronation 2019 in Southron Gaard. I had completed the bodice and skirt of the gown, so it was a fairly small job to assemble those, attach the fastenings, and make the breast patch. Sadly I was enjoying that event too much to get photographs, but I am told the play of firelight across the velvet and silk was lovely.

The dress is nicknamed the “M & M” dress, not only because the design comes from an illustration of ‘Maria and Margareta’, but also because there are 413 (or perhaps more) individual pattern pieces for the dress across the fabric, interlining, and lining. (Why a nickname? I have quite a few black and gold Saxon gowns, so it’s useful to have an easy way to identify each.)

The dress design comes from an illustration of Maria and Margareta, daughters of John the Steadfast, Elector of Saxony in the Das Sächsisches Stammbuch (the Saxon family / friendship book) of 1546, in the Dresden archives, which features drawings of the extended families of the Dukes of Saxony and their ancestors.

The dowry of Magdalene of Saxony (daughter of Duke George the Bearded of Saxony, and his wife Elizabeth) from her wedding to Joachim Hektor II, the Margrave of Brandenburg (heir to the Electorate) in 1524 lists approximately two dozen gowns. As a peer of the realm, this seems like a useful sized wardrobe for Christian! Magdalene’s dowry includes gowns of velvet and silk brocade, trimmed with pearls, similar to the M&M gown.

Design, Materials and Construction:

Design:the design is taken directly from the Stammbuch illustration of Maria and Margareta, although with the cuffs of one dress and the brustfleck design of the other. The dresses in the Stammbuch are similar to Saxon court gowns seen in other portraits of this period, so can be assumed to be an accurate representation of clothing of noble women of the period.

Materials and construction:  the gown is made of a natural fiber high quality velvet, which is about as close to period velvets as it is possible to get at an affordable price. Of course the joke is on me, because the pile is very thick, which makes it fiddly to sew (hence the “naughty corner”). The brocade is gold metal thread and black silk in a traditional brocade design. The gown is interlined with linen canvas, and lined in linen.

References:

  • 1526 Nuremberg wedding record: H. Doege, “Das von Questzische Hochzeistbüchlein, 1526”, Waffen und Costumekunde, 1922. Also see school regulations, textbooks, and pedagogical miscellanes from the lands of the German tongue: on behalf of the society for German educational and school history, Volume 34. Translated here .
  • Saxony family book: The Saxon family book 1546, http://digital.slub-dresden.de/werksicht/dlf/56803/1/cache.off

VPC2017: Meisterin Christian’s Child’s Smock

This entry is presented for the categories Child’s Play: Out of Your Comfort Zone (Embroidery), One Metre Material Project (linen and lace), Give What You Get, and  Togs, Togs, Undies.

Meisterin Christian says:

I  have been interested in the lovely late 16thC linen shirts with silk insert embroidery stitches, but alas this is too late for the clothes I wear in the SCA.  I decided to make one for my goddaughter for 2017 Midwinter Coronation, both as a gift to her and also as an experiment to learn more about these shirts and their construction.  I was also looking for a project to take with me on a 4WD camping trip at Easter.  (What I should have taken was the Skjoldehamn hood (although I hadn’t even thought about making it at that point), as trying to hand sew a white linen shirt outdoors in crepuscular light and a windy, wet, muddy environment was not ideal.)


I worked from several extant women’s smocks and boys shirts in Janet Arnold’s Patterns of Fashion 4, and a girl’s smock pattern in the Tudor Tailor.  As the child was only 2 years old I had to scale down the extant patterns in size, but still leave room for growth as the event was some months away.  There was always a chance that her growth would not be linear and the smock would either swamp her or be too small (I had backup plans for either scenario).  Also chances were, that given the pace of growth for toddlers and the number of SCA events each year, she might also only be able to wear the smock once.


The extant shirts and smocks are made of white tabby woven linen in various thread counts.  I made this shirt from less than 1 metre of such linen; offcuts from one of my own smocks.  I imagine that women in period, who we know often made shirts and smocks for their family (even if tailors or servants made their other clothes), would have used remnants in the same way for their children.


Each pattern piece in the original was hemmed first, with narrow (~3mm) hems and then the pieces were sewn together with the coloured silk in a decorative stitch.  Due to the light and mud (see above) the hems done in the field weren’t always 3 mm, but once back in the real world the later hems were nice and tiny.  There is no reference in Janet Arnold to the stitch used to hem the originals so I used a simple whip stitch with a white linen hand sewing thread; these stitches are essentially invisible in the completed piece.


Due to the less than optimal sewing conditions outdoors, the many small pattern pieces, and the danger of losing pins in the muddy grass, I loosely slip-stitched the hemmed pieces together before stitching the pieces together permanently with the insertion stitches.  Given the child is generally energetic, it seemed a little reinforcement to the slightly fragile embroidery stitches might be a good idea.  It’s entirely possible that this could have been done in period; the tacking stitches are also virtually invisible in the completed garment.


For the insertion stitches (that join the garment pieces together) I decided not to use silk because of the cost (since the child might only wear the shirt once) and because a toddler’s clothes are likely to need some serious laundering.  I substituted DMC embroidery thread, which I was assured would be colour fast even in nappy-soaking chemicals (so far, so good).  Having surveyed the silk colours of extant garments in Janet Arnold, I tended to a crimson, and with the help of the child’s mother and other godmothers selected a colour we all liked. Late period embroidery is definitely outside my comfort zone.  Having looked at the embroidery on various extant garments, and searched for information on period techniques, I experimented with a few until I found stitches that I liked.  Some of the extant shirts also have decorative embroidery on parts of the garments other than the seams (e.g. sleeves), and/ or also alongside the insertion work on the seams.  Given the child may only wear the shirt once or twice, I decided the additional work was probably not warranted.


The remnants I had were not enough to cut the sleeves in one piece so I had to piece them. I’m sure this would not be uncommon in period for economic reasons. Initially I planned to put the additional seam at the back of the sleeve where it would not be obvious, but then I decided to make a feature of it by putting it at the front and embroidering the seam which would add interest if the shift was worn with an open front sleeve.  I started my embroidery here. I decided I really liked the alternating triple stitch buttonhole stitch so I played around with the stitch until I found a technique that produced the right look and was easy to maintain in a steady stitching rhythm.  I sewed a couple of inches and decided that it was too large a scale for such  small garment, so unpicked it and went to double stitches.  Once I’d sewn the whole seam I realised it was really red and overwhelming, and then recalled a shirt that had a white linen thread stitched over the insertion silk embroidery on one shirt, and for which I’d thought – why would you do that?  Why use practical white linen thread decoratively on top of red silk?  Now I wonder if the embroiderer thought as I did that there was too much red in that stitch, and it needed more contrast from the white.  The stitch was also (comparatively) very slow and used a lot of thread, so I decided it wasn’t going to work for the whole shirt.  I decided to change to a single alternating stitch for the rest of the shirt. Its not clear if different insertion stitches were used in different parts of the same shirt, but it is clear that decorative embroidery used a variety of stitches on the same garment, so I went with the change.  It also made more of a feature of the centre front sleeve seams.  After some experimentation I chose a pretty standard looking insertion stitch (essentially an alternating blanket stitch with another stitch into the intersection to “knot it off”).


The body and sleeves were gathered into a collar and cuffs to make the smock more comfortable for the wearer.  For the same reason I choose to attach a flat band of lace to the collar and cuffs.  I briefly contemplated making the lace, but since the child might only wear this once, that seemed unwise. Ties at the cuffs and collar in the original garment were inserted through sewn eyelets, but I figured a toddler would have those out and lost within minutes, so instead I sewed soft tape ties on as neck and wrist closures.

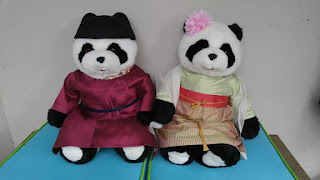
VPC2017: Mistress Antonia’s Sui/Tang Dynasty Garb

Mistress Antonia brings us these delightful outfits for Charley and Posey Panda – late Sui, early Tang Dynasty garb for the categories Out Of Your Comfort Zone (being from the Far East!), One Metre Material Project, and Togs Togs Undies!

Mistress Antonia says:
I can only offer the most modest documentation…
Posey’s outfit is modelled on images of court women of the Tang dynasty.  She’s wearing a two-piece outfit (襦裙), a typical Tang dynasty outfit consisting of a blouse (襦, ru) and a wrap-around skirt (裙).  Charley’s wearing formal attire, consisting of a round-collared robe (yuanlingshan  圓領衫) over an inner robe (tie li, 貼裏).

Both pandas have a full set of underclothes.  I didn’t have a lot of information about Tang underwear specifically, so I modelled them on more modern Hanfu underwear.

I gave Posey a pink peony headdress because large flowers on heads crop up in some Tang Dynasty paintings, such as Zhou Fang’s Beauties wearing flowers.  I wanted some version of the typical scholar’s/official’s hat for Charley, but it wasn’t really something I could make myself, and buying one was financially prohibitive, but I spotted felt bowler hats with ears on Ebay for just $5– and I thought that maybe a panda would rather have room for his ears than for a topknot he doesn’t have anyway. Everything was made from fabric I already had, and almost all of it just scrap.  Total expenditure for the project (excluding pandas) was about $15.