PGC2019: THL Joana de Bairros’ Portuguese Hat

Category: With scarfs, and fans, and double change of bravery, With amber bracelets, beads, and all this knavery.  An accessory your persona may have owned, made, used, or gifted.

Purpose:

There are many hats in the Portuguese paintings of the 1520s, in particular they are seen all over the St Auta Altarpiece where many of the female figures are wearing a relation of  a flat cap.  The hat I particularly liked was in Gregorio Lopes’s Visitation painting as it was well blinged up!  I had already made a version of the pink dress for the Baronial A&S Championship and made a version of the hat but it wasn’t quite right so I wanted to make one that was more in keeping with the portrait.  I spent a long time staring at the image to get a sense of what was happening with this hat and talked to Mistresses Isabel Maria and Cristia about it.  The consensus was that it was a kind of split brim arrangement that was sewed up on to the side of the hat.  Much paper was used to get a sense of how it worked.

Materials used:

  • A $2 shop pirate hat.  By taking the pirate fabric off it I was left with a ‘felt’ like base
  • Black velvet to cover the hat and make the folds on the hat.  I picked velvet as many of the St Auta hats look like they are made from velvet as does the one in the image above.  
  • Pearl and gold buttons – I managed to get the same design in two different sizes.  While there aren’t pearls on the hat in the image I like them and the buttons were the most appropriate looking ones I found
  • Pearl and gold bead aglets that I made myself using some oval shaped gold beads, plastic pearls and earring pins.  I decided to interpret the spiky bits on the hat as aglets as they are a common feature of 16th century hats.  Using the pearl and gold beads allowed me to match the buttons too!
  • A vintage filigree ‘gold’ and pearl brooch
  • A very small amount of gold silk to line the split brim
  • Black thread and a robust needle


Methods used:

  • I cut out a round of black velvet a little bigger than the hat base and ran a gathering stitch around the edges of the circle.
  • I pulled the gathering stitch so the material fitted over the round of the hat and hand sewed it to the inside of the hat.
  • I made a 10cm strip with black velvet on one side and the gold silk on the other.  I sewed this on the machine for ease of use.
  • I cut this strip into six panels that were long enough that when pressed flat against the hat reached the top of the brim and folded over the edge of the hat base.  These were sewed inside the hat all the way around the hat with cuts in the edge so they sat flat.
  • In the gap between each panel of velvet and silk I sewed three buttons with a big one in the middle and two smaller ones on either side.
  • I made the aglets out of earring wires and beads and used my pliers to create loops in the wire.
  • I sewed these aglets in fours on either side of the middle button  
  • I hand sewed the gold brooch it was on the front side of the hat like in the original image.


Verdict:

It is so pretty and much more in keeping with the portrait than my first attempt.  I didn’t count on there being so much bulk inside the hat with the edges of the panels sewing into it so it doesn’t fit quite as comfortably as I would prefer but it still works. 


Additional images

PGC2019: Meisterin Christian Baier’s Pearl and Garnet Goldhaube

Category: An accessory your persona may have owned, made, used, or gifted. “With scarfs, and fans, and double change of bravery, With amber bracelets, beads, and all this knavery.

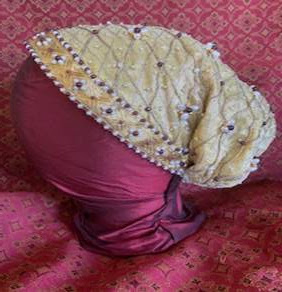
A gold silk goldhaub, decorated with small garnet and pearl beads


Persona period inspiration and use:

Goldhaubes were the coifs / “hairnets” worn by women of the 16th C Saxon court.  The dowry of Magdalene of Saxony lists a number of haubes, most with pearls and some with metal ornaments, or spangles. At least one of these haubes was noted as having been made by Magdalene’s mother, the Duchess, so this could be a project that a noble woman might make for herself or for a family member or friend.Christian is not fond of hats and headwear, but finds these haubes are generally the least annoying appropriate hair covering.  

This haube is intended to match an under-construction red velvet gown with guards of yellow and white silk brocade.


Design, Materials and Construction: 

These haubes were variously constructed, some appear to be made from embroidered or patterned fabric, some from cords knotted or constructed into a net; illustrations suggest that these were less likely to be made using more traditional hair-netting techniques like sprang, however men in this period wore “hairnets” which do seem to be made more often in those techniques.  Haubes were usually made of gold cords and/or narrow wares, or gold fabrics, often patterned in black; and were usually embellished with pearls, spangles and other ornaments.

Materials: gold metal-thread net fabric, lined with silk, pearls of two colours, garnets, metal thread, and gold cord. The haube is lined with fine bright yellow silk to both ensure the haube more closely tones with the brocade of the gown’s brocade, and to hide “fake” hair used to imitate haristyles of the period.

Construction: the fabric was embellished with pearls, cords, and semiprecious stones; lined with silk, and attached to a decorative band also decorated with pearls and garnets.


Reference:

  • 1526 Nürnberg wedding record:  H. Doege, “Das von Questzische Hochzeistbüchlein, 1526”, Waffen und Kostümkunde, 1922. 
  • Schulordnungen, schulbücher, und pädagogische miscellaneen aus den landen deutscher zunge: Im auftrage der Gesellschaft für deutsche erziehungs- und schulgeschichte, Band 34.  Translated here: https://jillwheezul.livejournal.com/tag/magdalena%20of%20saxony
  • Goldhaubes in Textiler Hausrat, Kleidung und Textilien von Nurnberg, 1500 – 1650 by Jutta Zander-Seidel, p.119-125.

PGC2019 Mistress katherine kerr’s headroll, veil, and earrings

My mother Caterina Mocenigo was from a well-regarded Venetian family, and her wedding cassone houses a number of lovely items once hers. She wore this headware in honour of the Queen of Cyprus, whose funeral procession was one of the largest ever seen in La Serenissima.

I wanted to make a small head roll and veil, but I wasn’t inspired until I saw a Bellini painting (ca 1500) of Caterina Cornaro, Queen of Cyprus. Rather than a plain roll, Caterina sports a black, white and gold one, variously described as brocade or damask or embroidered. The roll is securely shoved down over a closely fitted cap made up of what looks to me like alternating bands of lace, or possibly lacis in net. (Partridge, in the Art of Renaissance Venice, pg 96, describes it as damask, so take your pick!) A coronet crowns the whole ensemble. Underneath it all are two very fine gossamer black veils.
I liked the idea of a decorated roll, and of multiple parts to the headwear allowing different looks. Another, unattributed, painting of Caterina appears to show a similar roll (or possibly a cap?) worn much further back on her head with a different veil beneath. (One thing I learned when researching this was the assertion that women wore their ears covered by veils to maintain chastity, this being the route the Holy Ghost took to impregnate the Blessed Virgin Mary!) 
My head roll is in Sir Radbot’s colours, being part of a consort ensemble of a black coat, tabbed bodice and Venetian brocade skirt. The black ribbon and pearl earrings I’m wearing are modeled off the ones worn by the Lady with Squirrel by Montemezzano. The roll bears one of our favour pins at centre. The remaining decorations came from long-stashed stuff; the wool was scored at one of Southron Gaard’s beggar markets.
The accompanying veil is silk chiffon, chosen for its sheerness and drape. The edges were stabilised with starch; Master William de Wyk demonstrated how to extract starch by heavily kneading a flour and water dough, then washing the starch out of it; that makes a clearer solution than the common approach of boiling cornflour and water. Ironing a starch-dampened edge onto brown paper made it a lot easier to cut a straight line and to press a fold into this most uncooperative fabric.
Caterina Cornaro paintings: https://theconversation.com/hidden-women-of-history-caterina-cornaro-the-last-queen-of-cyprus-108495
Another Bellini depiction of Caterina (far left) wearing the same roll: https://commons.wikimedia.org/wiki/File:Miracolo_della_reliquia_della_Croce_al_ponte_di_San_Lorenzo_di_Gentile_Bellini,_dettaglio_(4).JPG

VPC2017: Meisterin Christian’s Skjoldehamn Hood

This hood is presented for the categories The Neck Best Thing, Cover Me, One Metre Material Project (wool fabric), Counting (on) Sheep.

Meisterin Christian says:

I anticipated needing some additional warmth around my head and neck for the Fiery Knights event, but I didn’t have anything as I’m not a fan of hats or headwear.  I decided the most appropriate period choices seemed to be the Hedeby hood or the Skjoldehamn hood (whether or not the Skjoldehamn hood is Viking or Sami remains a matter of debate, however as both Viking and Sami occupied the area at the time (late Viking-period), some concordance may not be out of the question).  I wanted the hood to go with the red wool Viking coat I made for cold nights at camp, and remembered that somewhere I had scraps of that fabric.  Upon excavating my fabric stash, I found I had two strips of the fabric, each about 90x30cm.  This ruled out the Hedeby hood, but was pretty much the same size as the fabric for the Skjoldehamn hood. I decided to make the hood as close to the original as possible to the original to better understand how the period garment was constructed and might have been worn.  The construction of this hood is not quite as simple as it may seem, however I could easily have completed the garment in less than one day if I’d had the opportunity to do so.


The original hood is comprised of a square of wool about 60×60 cm, which was folded in half and sewn together along the top and down the back (of the head), with a slit at the lower front and open seam at the lower back into which square gores approx 30×30 cm were inserted, and the front of the hood was slit open for the face opening.  Since I had two strips 90×30 I had the right amount of fabric, but the hood had to be sewn together (rather than slit open) at the front as well as the back.  The person who had worn the original hood was probably an adult around 5 ft high (just a few inches shorter than me) so I thought I’d make the hood the same size, but with slightly smaller seam allowances.  The finished hood is snug and comfortable but not tight, and covers the top of my shoulders, chest and back just fine, so the sizing seems good.  I do find it a little difficult to lower and raise the hood but that is largely due to my ponytail.


I constructed the hood as close to the original as information allowed, e.g. all the seams were sewn from the outside, by turning the seam allowances in along the top and back of the head of the hood, and along the gores and sewing the outside of the seam with in an overcast stitch.  The original was described as a non-decorative stitch; I used some wool sewing thread that was a close match for the fabric colour so the resulting seam was definitely not decorative, and mostly invisible. All the seams in the hood other than along the top of the head were then opened out, and stitched from the outside with an alternating, slightly diagonal running stitch which was also non-decorative.  This essentially flattens out the seam allowances and holds them flat on the inside of the hood.  This is an effectively way to ensure they don’t stick out and catch on the wearer’s hair.


Along the top of the head of the original hood there are several rows of running stitch that go across the top of the head, and then “dip” to follow the curve of the back of the head, creating what some call a “cockscomb” effect.  It has been speculated that this was intended to make the hood sit better, and further forward on the head.  I replicated these stitches, although I did not take the final line of stitching so deep at back as the original so as to accommodate my topknot ponytail.  This “cockscomb” did indeed seem to keep the hood more snug and more forward, but this might just have been because it fit closer around the head.  We will never know if this was intended in the original, or was this originally done to e.g. “downsize” the hood to fit the specific wearer.


I had to depart from the original construction technique in needing to overcast all raw edges (other than the top seam which was enclosed inside the lines of running stitch) as my fabric was quite “sleazy” (thanks to Baroness Eleonora for this weaving term meaning a ” fabric with a very loose weave which has a tendency to come apart at the slightest provocation”).  I used a simple overcast stitch again in the same thread so this is largely inconspicuous.


At the face opening of the original hood a narrow seam allowance was turned in, and a non-decorative cord (i.e. not a contrasting colour) was couched around the edge of the seam allowance of opening on the inside with a decorative couching (i.e. contrasting) stitch.  The original decorative stitch changes colour at one point, as if the maker ran out of the first coloured thread.  I choose to use one decorative colour (in this case the pale gold wool that was used to decorate my coat) as it would otherwise look odd to modern eyes.  It seemed a shame to miss out on the opportunity to use a decorative cord around the face as well (other garments in the original outfit have some highly decorative touches, and the hood seems somewhat under-decorated by comparison), but I found in my stash a cord of a slightly different red wool which I’d made for another project.  This was then subtly decorative, hopefully satisfying both me and the original.


The lower edge of the original hood was not folded under, merely overcast along the cut edge.  My sleazy fabric was not stable enough to do this, so I had to fold under a small hem.  One source says the original hem was overcast with a stitch that was “parallel to the thread”, so I used a simple blanket stitch.  In the original this overcasting is not decorative, but I used the pale gold-coloured wool again to match the decoration on my coat as by this time the hood was looking a bit plain and not very “matchy” with the coat.  I’m still not sure how I feel about this and may yet change that.


The original hood has two cords attached to the outside, described as being placed “under the ears”.  There is speculation among archaeologists and reenactors as to what these cords are for (e.g. pulling the hood closed around the face, pulling it open by tying at the back of the neck / head) but it was noted that there is little wear apparent so it is assumed that the cords on this particular hood were not much used.  I did have some cord left over from my coat which just happened to be the right length for these.  I pinned the cords on to the hood and tried the hood on, pulling the cords both forward and back.  I decided I didn’t really have much need to pull the hood closed (no snow storms expected) or keep it open (I preferred to pull it down around my neck for temperature control and to avoid impeding my peripheral vision), and since the cords really annoyed me dangling either side of my head I took them off and put them in the naughty corner, from where they may or may not be attached at a later date.

VPC2017 Baroness Agnes’ French Hood & St Birgitta’s Cap

Baroness Agnes brings two articles of headwear – a French Hood for category The Neck Best Thing and a St Birgitta’s Cap for category One Metre Material Project

She says about the hood:

A french hood to compliment Agnes’ Tudor garb. It’s wired fake-buckram covered in brocade, with glass pearl accents to create the look. It perches on the head rather than being an encompassing hat, so I shall make another eventually.

And about the cap:

A super-useful hat to hold the hair away that can be found through Europe 13th to 16th C. This one specifically is a commission for katherine kerr. Linen, with manufactured lace because I’m no embroiderer.  This is being entered in the A&S championship.

VPC2017: Lady Melissa’s Winter Hood

Lady Melissa brings us this lovely hood for the categories The Neck Best Thing, Cover Me, Counting on Sheep, Tis the Season, Give What You Get

She says:
This hood was made in the 13th century style, and can be worn as either an open hood or a fitted hood. The outer shell is wool, and it is fully lined with winter coat possum fur; period pieces would have been lined with rabbit or, for the very wealthy, ermine. All of the fur was hand-pieced and hand sewn. Only the central (hidden) seam in the hood was machine sewn. The buttons are self-fabric. There is a central plate with button holes because the test pattern did not fully account for the thickness of the possum fur, and it would not close without choking the wearer. While I have not seen a similar device in illuminations, it would be a suitable period solution.
This item is for a very lovely lady I met at Canterbury Faire (she may have to share with her family, though!). I was very glad to be able to work with the possum furs, which were luxurious and provided by the family. They are all relatively new to the SCA, and I hope that they enjoy their next CF with some additional warmth!

VPC2017: Lady Mathilda’s Hood

Lady Mathilda presents this hood for the categories Cover Me and The Neck Best Thing.

She says:
This hood is the first I have made in a long time, and definitely the first that I have properly researched.
The hood is made of vibrant pink linen lining and a grey tabby woven wool outer with medium length liripipe.
It is based off a hood (D10597)  that forms part of the Herjolfsnes finds from Greenland from around the beginning of the fourteenth century.
I have chosen to make the hood a bit bigger than the original, as I wanted to have lots of room for comfort.
As in manuscripts from much of England and Western Europe at the beginning of the fourteenth century, the hood is often depicted with some lines of decoration around the bottom. I have included this in my hood- by adding two rows of parallel chain stitch in light and dark blue Appeltons’ Embroidery wool.
The hood is handstitched using running and back-stitch, and is fully felled.

VPC 2017: Mistress Taddea’s Skjoldehamn Hood

VPC 2017: Mistress Taddea’s Skjoldehamn Hood

This is Mistress Taddea’s second Pentathlon Challenge entry, and she completed it within two days, which is impressive. It is a Skjoldehamn hood, and was made for a newcomer, and given to them to wear at their first event. It is an entry in the categories One Metre Material Project, Give What You Get (gift for a newcomer), The Neck Best Thing and Embellish It. 

Fabric and embroidery are both wool. Embroidery is simple chain stitch and running stitch.