
EEEEC: Ginevra’s FTT Article on Hand Sewing for Beginners
To see the article, entered into this challenge under the category education, as published in From the Tower, please follow this link. Otherwise, read on…
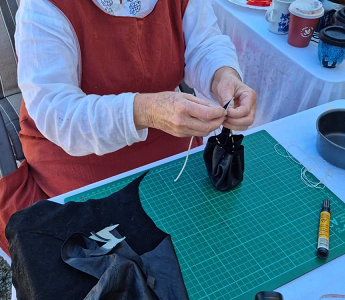
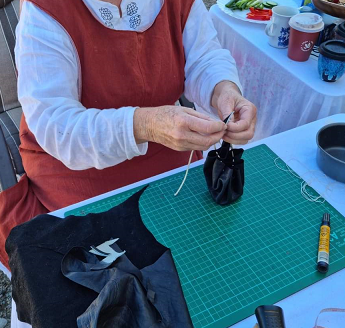
Handsewing is most likely easier than you think, and though it’s slower than using a machine, it doesn’t take up all your table space, and is generally more portable, quieter, and gives you something to play with that isn’t your phone!
What you need to start
A Detailed Plan – This is really important if you want your project to turn out well. For a first handsewing project, I’d suggest something fairly small, and quick, so you can have the glow of accomplishment before the project seems to start growing bigger with every stitch, and you give up. Napkins are great, being both small and practical, and aprons and pouches are good too, and only slightly bigger. For an even bigger, and only slightly more advanced project, tunics, shirts and shifts are great. Dagging for the list field would also be a good project to start with.
If you’re making a tunic, shirt or shift, I’d suggest making a sketch of the way you want the project to look at the finish, or making lots of notes. Collect pictures of other people wearing similar things, and what bits you like and want to include in your version. There’s often a lot of different ways to do things, and if you need help at any stage it’s a lot easier if the person helping knows *exactly* what you’re trying to make. If you’re going to buy material, I’d suggest figuring out how much you need for 150cm wide fabric and 115cm wide fabric, because nothing is worse than doing calculations in your head at the cutting counter. (Maths paper is great for moving garment pieces around to see how they fit so you can find how much you need.) I also suggest keeping a small offcut of the material you’re using with the plan, and any contrast fabric, buttons etc as well.
You’re unlikely to finish your project in a single sitting, so when you’re going to work on it is also a good thing to have in your plan – if you’re only sewing at the hall on Sundays, it will take longer than if you work for ½ an hour every evening, but if you’re likely to want to check with a more experienced person regularly than the hall might be a good choice. Only you know what you’d be most comfortable with, so there are no wrong answers.
Once you don’t have to think about every stitch, I’d suggest lining up some entertainment with regular, planned breaks built in. As you reach the age of …maybe not discernment but definitely nurofen, scheduled breaks give you a chance to at least roll your shoulders and stretch your hands, arms and back before you start getting all regretful that you didn’t do that earlier. There are some suggestions for listening that I’m enjoying elsewhere in this issue.
Making your plan can take longer than you think, or be sorted in a single conversation. So long as you have one before you cut anything, you’re all good. Which brings us to….
Scissors – both big, for cutting out fabric; and small and pointy for trimming threads, and clipping into curves, when you get to sewing them. To start with, you probably have something around the house that will work just fine, for example, nail scissors are a great size for thread trimming.
Needles – it’s worth spending money to get good ones even for your first project. Good needles, like those made by John James or Bohin, are usually around 5-7 dollars a packet, are nice and sharp, which makes sewing easier, and have nice smooth eyes that won’t munch up your thread so it snaps all the time, which is a real nuisance till you get good at threading needles. Some needles are gold plated around the eye – I’ve never found it makes any difference to how smooth the eye is. I personally like small ‘quilting’ needles, but what size and type you get really comes to personal preference. You will eventually wear the plating off, and get a nice curve in your needle as you use it. This is a sign to check that the needle is still smooth and sharp, or get another one from the packet.
Thread – here’s the other place where spending a little extra makes a big difference. Good thread will not randomly knot or break as often as cheap thread, thus saving you hours of angst, and possibly saving your project from being hurled across the room and living in the naughty corner till you shift house. Mettler and Gutermann threads are both worth the money, and pretty easy to find – I prefer Gutermann because you can take the bottom off and put your needle inside the tube – which makes it far less likely that the needle will migrate and either stab you when you pick up the project again, or just vanish. Either way, pick a colour that’s as close to matching the fabric you’re going to use as you can get, because any weird looking stitches you make won’t stand out so much. Later on, I’m going to talk about basting, which is another good way of not getting accidentally stabbed, and you don’t need good thread for that – the cheap thread from the supermarket will work just fine, so if you’ve already got that, you’re ahead of the game.
Thimble – If you’re not playing a stringed instrument for hours a week, you probably want one of these. They’re available in a range of materials, in a range of styles and sizes, at a range of prices from a couple of dollars to …. Rather a lot, and there’s even ones for people with fake nails, so there really is a thimble out there for everyone. I like the ones like little metal fez’s, and I’d suggest having one that goes over the top of your finger for your first few projects, because having a needle skitter off a ring thimble and go up underneath your nail is not something I want to have happen to anyone I like. As well as protecting your fingers from being stabbed to shreds, thimbles also help you sew with smoother movements, and that saves your joints. Find one that fits the second finger of your dominant hand, because it’s easiest to use your first finger and thumb to guide the needle to the right spot, and the next finger for pushing, as shown in https://www.youtube.com/watch?v=gkAlOprpD5E
Finally, a zip lock bag, or a cookie tin, to put all the above in. You don’t have to go with either option, but you do want a way to keep everything together, because running around the house looking for the scissors does not get your project finished.
Getting Started
You could, easily enough, put a knot in the tail end of your thread and start sewing, but…. What happens when you get to the other end? Making a knot there isn’t so simple. To make things harder, sometimes the starting knot will pull through the fabric too, and stacking them up to make a knot big enough to not pull through isn’t as easy as making the first one. So… for a method that is guaranteed not to pull through, and done equally as easily at both ends, try the following technique. Make a tiny stitch a couple of mm long (leaving a small tail if you’re at the starting end). Make a second stitch right on top of the first one. Make a third stitch in the same place, but put your needle through the loop this time, so it’s caught down. Then either start stitching if you’re at the start, or trim the thread leaving a short tail if you’re at the end, and your thread will stay secure!
The most useful stitch for handsewing is whip stitch. You can make entire garments using only this stitch, and it’s pretty quick, and very straight forward. Put the stitches close together and you’ve got an excellent way of reinforcing an area, spread them out and you’ve got a nice quick seam that doesn’t need a straight line pre-marked. Want to finish an edge nicely? Turn the edge under twice if the fabric frays, or once if it doesn’t, and whip stitch the edge down (the third link may be helpful). If you’re making a garment with fabric that frays, like a linen shirt, consider doing this to all the pieces before you start sewing them together. Want to add a lining? Make it the same as you did the outer, and whip stitch the layer together. Want to add trim? Whip stitch it down close to the edge, or whip across a strand of yarn and call it couching. Easy.
https://www.youtube.com/watch?v=pG86hhrDdzQ is an okay tutorial on how to sew whip stitch, but please, don’t decide how long your thread should be based on how long the seam is. That way lies madness, and all the bonus random knots you could ever want. If your thread goes from your hand (where you’re holding it) to your shoulder, then that’s long enough. For my first projects, many years ago, I was told to use threads that were only as long as my hand to my elbow – and feel free to do that if you choose. Shorter threads are not only less likely to tangle, but you sew faster with them, because you’re not spending as much time pulling all that thread through. If you want to go really fast – most times it is possible to pull through only a little thread after your first stitch, and then make a second one before pulling the thread all the way through. It can make your thread break a little more often, until you’re used to it though.
https://www.youtube.com/watch?v=mLtGzTgjj3o is another good whip stitch tutorial if you’re less of a beginner, and looking for advice on how to refine your stitching.
https://www.youtube.com/watch?v=INcjixkx66o is an older video, and slightly fuzzy, but it’s a pretty good tutorial all the same in how to hem using whip stitch.
Not *quite* as useful, but another excellent stitch to know is running stitch, shown at https://www.youtube.com/watch?v=nbtapXA44AY . Running stitch with long stitches is excellent for basting, which, as I said above, is a great way of not getting randomly stabbed. It also avoids pins that grab and tangle your thread up, or pins that come loose, or do any of the other things that pins do to make sewing harder than it needs to be. Basting is used to: keep hems in place while you’re sewing them; keep seam allowances even while you’re sewing them; temporarily assemble a garment, or part of a garment while you try it on; and a number of other things. It’s quick and easy to do – just put large (1-3 cm) stitches along the line you want held in place. Running stitch is also useful for sewing down trims, or the first line of bias or hemming tape, or as a simple embroidery stitch that also keeps things flat. It’s also useful for gathering, and in other places where whip stitch just isn’t the right thing to do (sadly, this does happen).
Next steps
So you’ve got your supplies, and you’ve practised a stitch till you’re comfortable with it and you really want to get started on your tunic or shirt…
It’s easier to handle smaller pieces of fabric than large ones. I am, when not writing this article, currently regretting trying to finish a dress in a hurry as I try to tidy up long seams with fabric that does not want to bunch up easily in my hand. Learn from my mistakes, and seriously consider finishing the edges of your pieces of fabric before sewing them up. It really does make things easier, and seams that are nice and flat are much more comfortable to wear, and also last longer than unfinished ones. You can even hem as you go – cut out, say, the sleeves, then hem the sleeves, then cut the body panel, hem the body panel, then sew the sleeves to the body. Then cut the gores, and… you get the picture. This way of working is handy if you’re worried about telling all the rectangles apart if you cut them together, and also has the advantage that when you’re sewing the last seam, you usually do not have anything but the hem to do, rather than a whole lot of seam finishing.
Putting in a hole for your head to go through before you sew the arms on, is also a good idea to make things easier on yourself, and you’ve probably realised before now that your head is not square or rectangular, and we haven’t talked about how to handle curves. First – breathe. Everything is easier when you’re breathing. Next – look back at your plan we made in step one. What does your neckline look like in the sketch, or in the notes?
One way to finish your neckline is to use a tiny hem. Put a line of running stitch close to the edge first, because part of your neckline will be on the bias, and that means stretching and fraying. If you put in a running stitch though, it holds it all nicely in place till you can fold a tiny roll, and whip it in place.
Another fairly easy way to finish a neckline is to use hemming tape – not the iron on stuff, but the type which is usually next to the bias binding , and is pretty easy to find in a number of colours and fabrics. First, you line up the edge of your fabric, with the unfolded edge of the tape, and sew it to the garment with a running stitch in the valley made by the fold in the tape. Then you roll the tape over, so the raw edges are sandwiched between the garment fabric and the flat side of the tape, and whip stitch down the other folded edge of the tape. You can do this so the tape winds up on either side, but I like it on the inside, so I can start and finish the tape at the centre back of the neckline, and thus easily tell which way round the tunic goes.
A third way is to use a facing. This is a little more complicated, but gives you a chance to use contrast fabric if you want to. The easiest way to approach this method is to use a square or rectangle facing, extending a few centimetres past your neckline in all directions. Then, making sure the facing fabric is exactly where you want it to be, cut a hole the same size as the one on your body panel, so they line up. Then either sew small running stitches about ½ a centimetre from the cut edge, or turn back the edges of both fabrics and whip them together. Depending on the fabrics you’ve chosen, you may need to clip the neckline back to your stitching to get it to lie smoothly – but some fabrics will stretch that little bit. Check by pulling the facing fabric through the hole to the other side, and see how smooth it is – if it’s pretty smooth, then iron around the neckline you’ve just made, if it’s not, clip really carefully to remove tiny triangles of fabric with the point of the triangle close to your stitching, then pull the fabric through again, and iron it nice and flat. Ironing at this stage will make a huge difference to how good the finished tunic looks, and will make the next bit a bit easier, so it’s well worth doing. Finally, turn the edges of the facing under, and sew them down all the way round, so the facing doesn’t flap about. For bonus points, sew a line of running stitch around the neckline, and another one around the facing, so they stay flat and working nicely together, and you’re done.
You’ll see a lot of different shaped facings around, and there’s probably more with the facing fabric on the inside, and you’ll notice that they come in a number of ‘not square’ shapes. Square is definitely the easiest to do, and this article has ‘for beginners’ in the title, but if you’re feeling really bold, you can try a different shape – the process is the same.
If you really like the facing technique, you can also use it around cuffs and hems, (and for cuffs, if you accidentally cut your sleeves a bit shorter than you wanted, you can use the facings to add a bit of length – cut the facings double the finished width you want, plus seam allowances, sew them to the end of your cuffs one side at a time, and no-one will know it wasn’t part of the original plan)