


9th Century Shield Smithing | Lord Halfdan’s Account
History
Roundshields were commonplace through the viking age (8th to 11th century). They measured around 90cm in diameter, but were as small as 70cm, and as large as 94cm. The shields were designed to cover the wielder from their knees to their collarbone or chin.
The shields were constructed from butted fir, pine, or spruce planks at a thickness of 8-12mm. To hold the planks in place, three iron bands ran the length of the shield at various intervals along the back. These were attached with broadhead nails, and the centre one acted as the handle. The disk was planed from the centre out so that the edges were thinner and lighter. This made the shield easier to wield. Often the centre would be 8-12mm thick, where the edge would only be 6mm.
In the centre was an iron boss, often 150mm wide and 3-5mm thick. Some had a neck and nob, used for catching and potentially breaking the blades of swords. Where there wasn’t a metal handle, a wooden handle ran the length of the shield, passing behind the boss. A roundshield had one strap that ran across the shield so that it could be worn across the shoulder and back. Unlike other forms of shield, there were no straps that went around the wielder’s arm.
The shield was edged with rawhide, sewn on wet and allowed to dry. As it dried, it would pull the boards of the shield tighter and strengthen the construction. It also helped prevent incoming strikes from splitting the shield. There are accounts of iron-edged shields, but little evidence to support this. The shields were also faced, meaning they had a layer of linen or leather adhered to the front. Often this was done with glues made from animal fats, or other connective tissues. Depending on the construction, and material used, round shields weighed from 3 to 8kg.
Round Shields were effective defensive tools, but also used offensively in a pinch. The edge could be used to punch, or be swung to strike an opponent. In some accounts, the shield was thrown, especially to trip a fleeing opponent. With that said, these moves are illegal under SCA combat rules (for good reason).
Halfdan’s Shields : Practical Vs Decorative
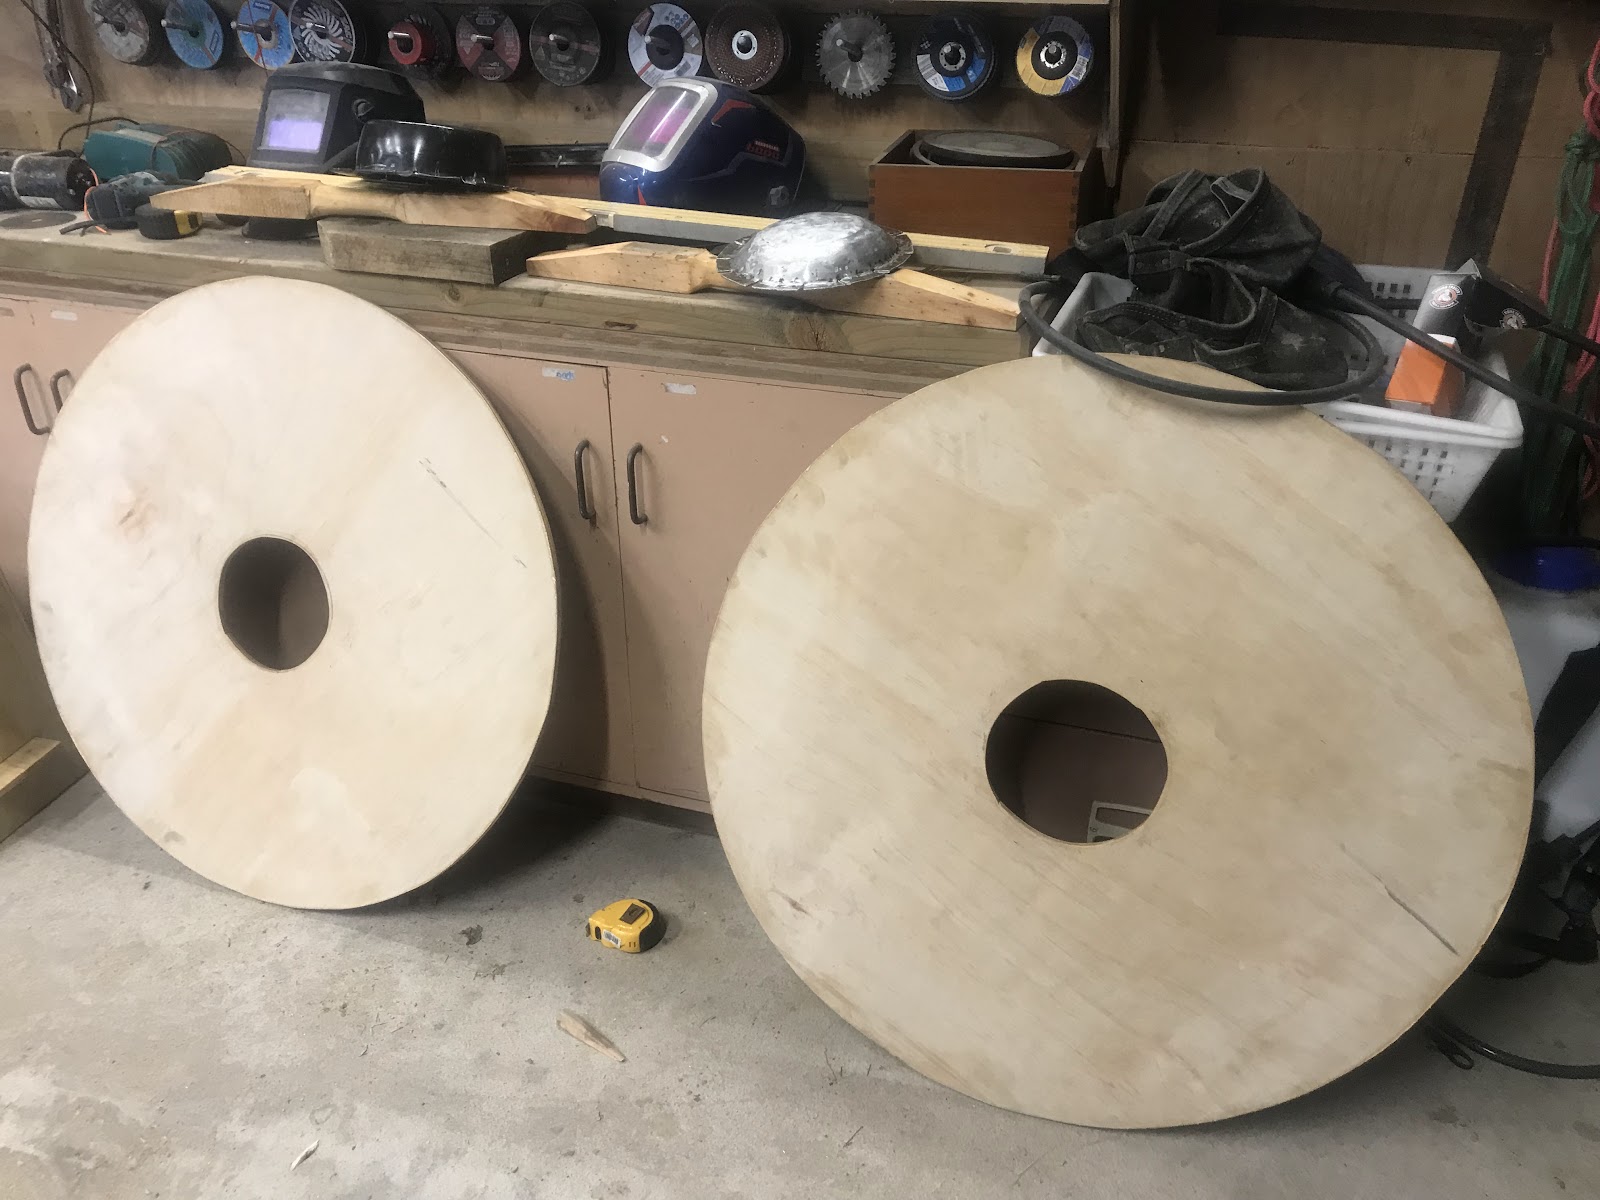
The shields I’ve constructed were built based on their purposes. Practical shields are constructed from plywood. The three practical shields (seen in the comparison images detailed later) are 12mm plywood, giving them a weighty feel. They are cut in disks, with a hole in the centre for the grip and boss. The disks are planed out from the middle, so that they are lighter and thinner at the edge. This makes the shields lighter, and easier to wield.
After the disc is cut and shaped, the hardware is attached. I sourced the bosses from second hand pans, metal lids, plates or bowls, and attached them with trimmed and clenched nails. The handles were made from refuse pellet wood, rounded in the centre for a grip, and bolted on so that it passes through the centre of the shield behind the boss. The mid-sized practical shield has a belt attached, so that one may wear the shield on their back.

Once the hardware is attached, the shields can be faced. I couldn’t get my hands on linen, so instead I used calico. I cut and hemmed a hole in the centre to fit the boss, then painted the shield face with a layer of PVA glue. Finally, I stretched the calico over the front and stapled it along the edge. Any area that isn’t painted over is coated with linseed oil (including the boss) to prevent rot and rust.
The last stage is the edging. These practical shields are edged with pipe insulation and duct-tape (as they are designed for youth armoured combat). Thanks to the shape of the pipe, no other attachments are required.
Ideally practical shields are lightweight, and strong. My lightest shield is the small 54cm diameter one – closer in size to a buckler. It only weighs 1.4kg. It’s the oldest, and uses slightly different materials for its construction.
The white shield is 80cm, and 3.9kg, a good size although slightly cumbersome. The largest is 92cm, and 4.9kg, which is usable, but only in short bursts (which isn’t ideal, the point of a shield is to prevent combat occuring in a short burst…)
The decorative shields were constructed similarly, but with a more generous weight as they weren’t (and aren’t) intended for fighting with. The discs were originally a square of planks butted together with glue, with two planks running in the opposite direction across the back and nailed in place to keep the planks bound together.
The discs are cut out, with a hole cut for the boss, similarly to the plywood practical shields.

Next the hardware goes on, meaning the boss, handle, and a belt if required. All hardware, on both kinds of shield, are attached with trimmed and clenched broadhead nails.

Because the planks are salvaged, they are often slightly different thicknesses, so the front of the shield isn’t flat enough to be faced. Instead, it’s left raw for painting, or oiling. The back, and edges are generously oiled.
This image shows the front of the shield, with nails hammered through to attach each plank to the backing plank. The boss, just like other hardware, is attached with broadhead nails.
The final stage is edging. On these shields, I’ve used upholstery offcuts and furniture tacks. The leather is soaked in warm water and pulled over the edge and tacked in place. As the leather dries, it shrinks and pulls the shield tighter, making the construction firmer.
The decorative shields way more, up to 8kg. They are far thicker, with some planks around the 20mm mark. I’ve only ever made two, both 90cm diameter.
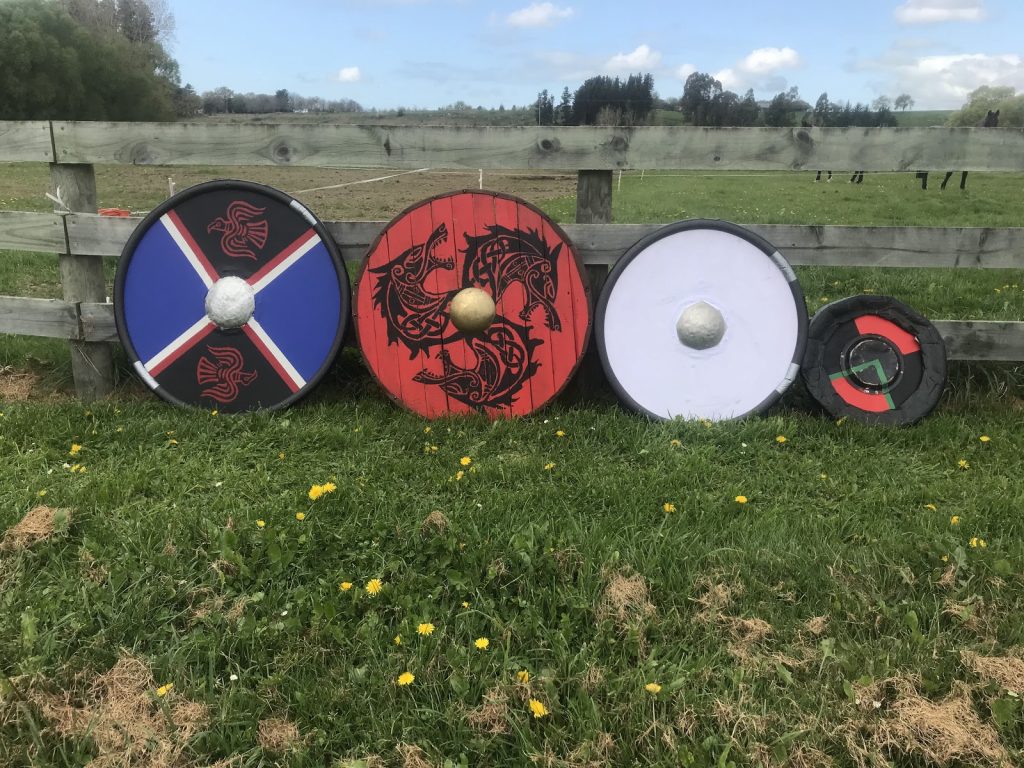
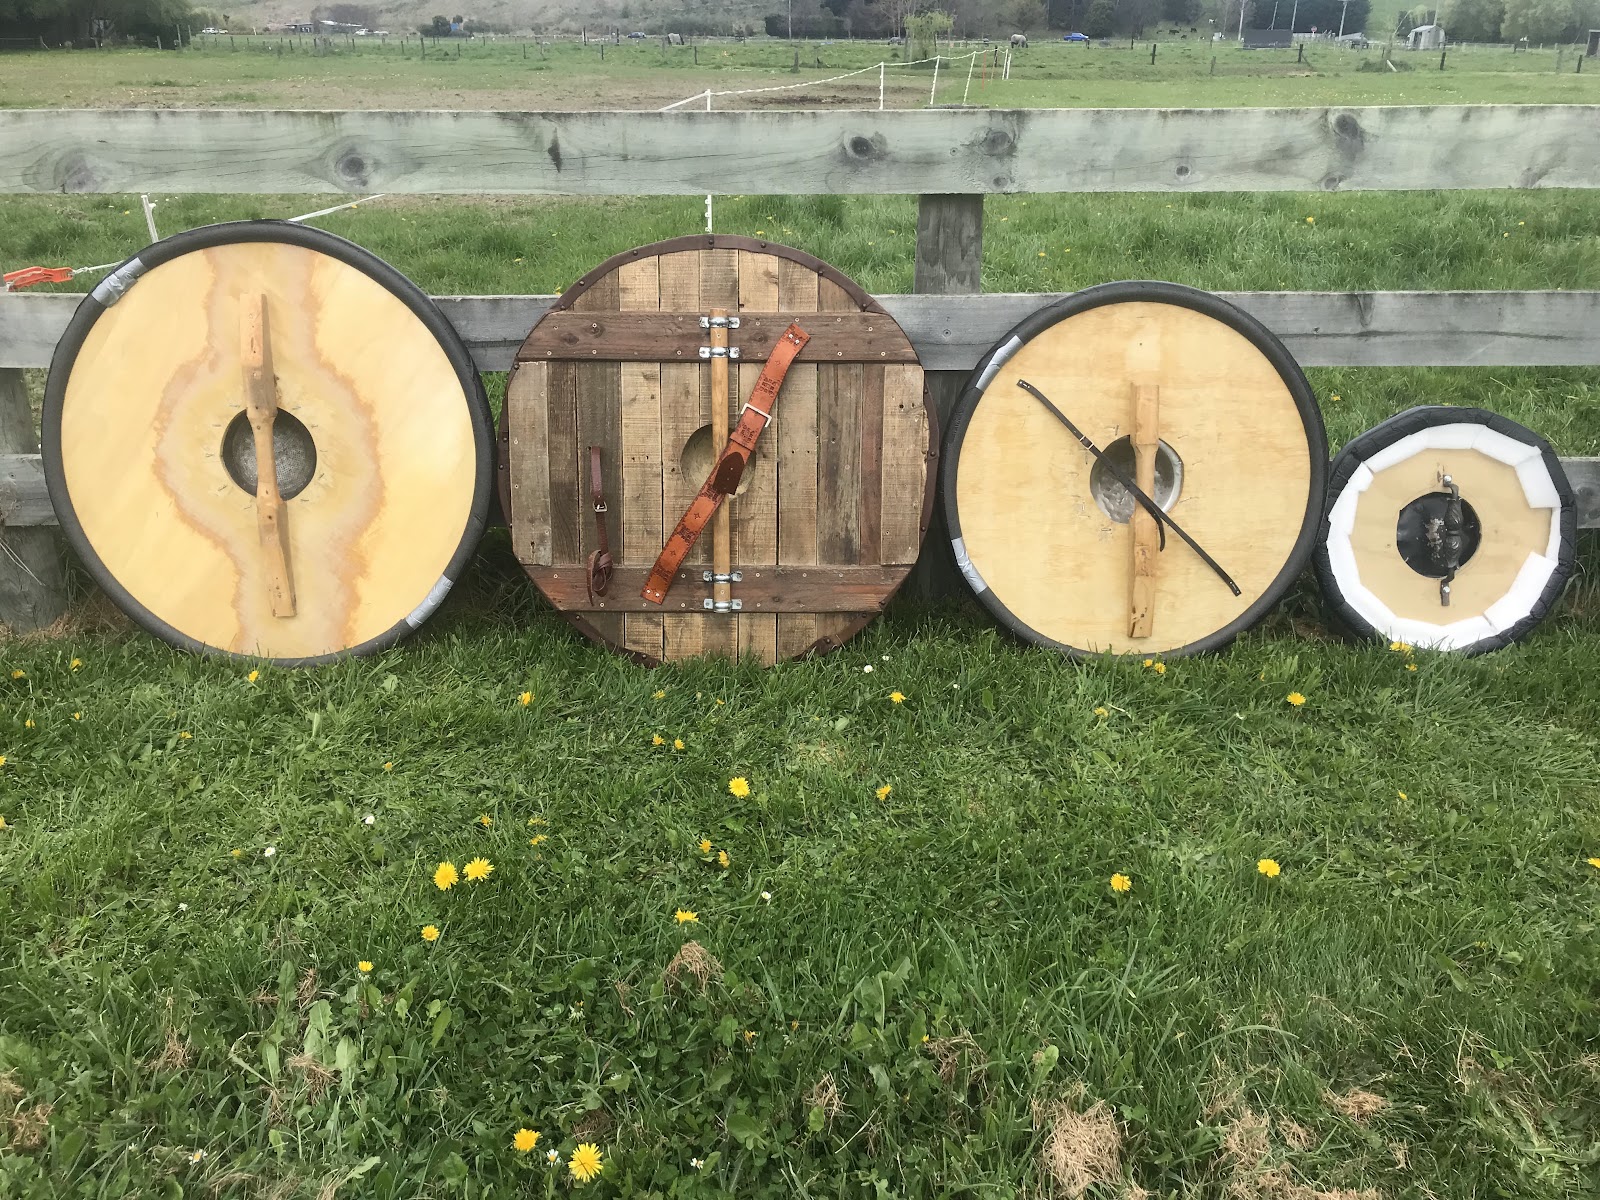
These two images compare the final results of the decorative, and practical shields. The far left is the largest practical shield, 92cm diameter, at 4.9kg. The second from the left, the red one, is decorative, 90cm, and 8kg. The smaller white one is practical, 80cm, and 3.9kg. The smallest is 54cm and 1.4kg. (note: all diameter measurements include edging. Padding edging adds about 2cm to measurements)
All but the white shield are painted, the white one is only faced. (I’d like to mention that the design of the decorative shield is not my own.) The smallest is painted, and unfaced. Notice the grooves between the planks on the decorative shield, while the others are all plywood. As far as hardware goes, the bosses on the two larger practical shields are an old flying pan, and a second hand lid. The smallest shield uses a tin plate, and the decorative shield uses a bowl glued onto the shield. Three handles are wooden, one is metal – salvaged from a chandelier. The straps are all second hand belts.
Historical Deviation
My method is not 100% historically accurate. For practical shields I’ve used plywood. There were laws which stated a shield should be constructed of laminated wood, but there is no archaeological evidence to support this.
- My plywood is on the thicker side, with most shields being 8mm.
- My bosses aren’t iron, but rather second-hand metal plates, lids etc, often steel. They also measure a tad larger, at 200mm, not the historical 150mm.
- On my decorative shields, I’ve used tacks to secure the leather edging. Historically, the edge was stitched on, rather than nailed.
- Only my decorative shields have bracing, but instead of iron bands I’ve used planks. They also run perpendicular to the handle. Bracing was usually placed parallel to the handle. On the note of planks, I don’t know the wood from the pallets I’ve used, though I suspect it’s pine.
- Other mentions include: PVA in place of animal glues, and, obviously, powertools.
Wrapping Up
These aren’t all the shields I’ve made, just the more recent ones. I have plans and sketches for shields to come, including more practical shields that are thinner and lighter.
Shields are just as much an artwork, as they are a defensive tool. If not for the heraldry that goes on them, then the hours and days spent crafting them. Just like a tapestry, painting, or stained glass, they require precision, detail, effort, a rigorous creative process, patience, and care. The more of these one has, the better their artwork will come out – the better you look after your shield, the better it will look after you.