

Quick Roman clothing with minimal sewing
Dressing for an SCA event in warm or hot weather can be a challenge. Canterbury Fair is notorious for some hot days that make typical Viking or Northern European garb uncomfortably heavy. However, there are some dress styles from ancient Roman times that do work well in this weather, and are fairly straightforward to make.
These designs are: for women, the Roman form of the Chiton (variant 1, variant 2, and variant 3), the Peplos (variant 1 and variant 2). For Roman men, a sleeveless tunic. There is also a Unisex tunic with sleeves. There is a Greek Chiton (male or female), and a Peplos (also male or female). There are some words about the toga, and some links to more information about Roman clothing.
What you will need
Bare minimum
- The fabric quantities here are given in multiples of a basic block 1.5m wide by 2.0m long. A suitable fabric is a plain coloured single bed sheet (NZ single sheet size is 1.8m wide by 2.65m long). Linen, cotton or poly-cotton materials can be used, but make sure that any synthetic content is less than 50%, otherwise it will not feel good in the heat, and is dangerously flammable around a fire. Also, flannelette or satin sheets do not work well – avoid.
- A belt or cord to tie the waist.
- Sewing thread, pins, needle, scissors.
Ideally
- Twice the minimum fabric amount – either a bigger garment, or more of them.
- 6-10 domed or shanked buttons, i.e. not the buttons with holes through the main part.
- Access to a sewing machine.
- Fine wool fabric for a top garment.
Colours
- Any plain solid pastel to deep colour.
- You could wear white, natural linen, and very pale colours for top garments, especially if you are a child or male, but but much better to keep it for undergarments. It can be a bit see-through, and shows the dirt really badly. Also, it doesn’t look rich.
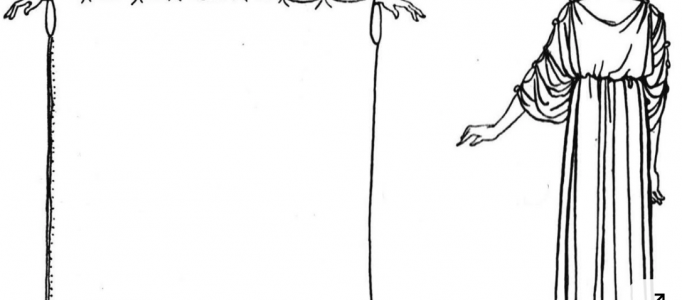
(Women’s) Roman Chiton – variant 1 – needs 2 x minimum fabric
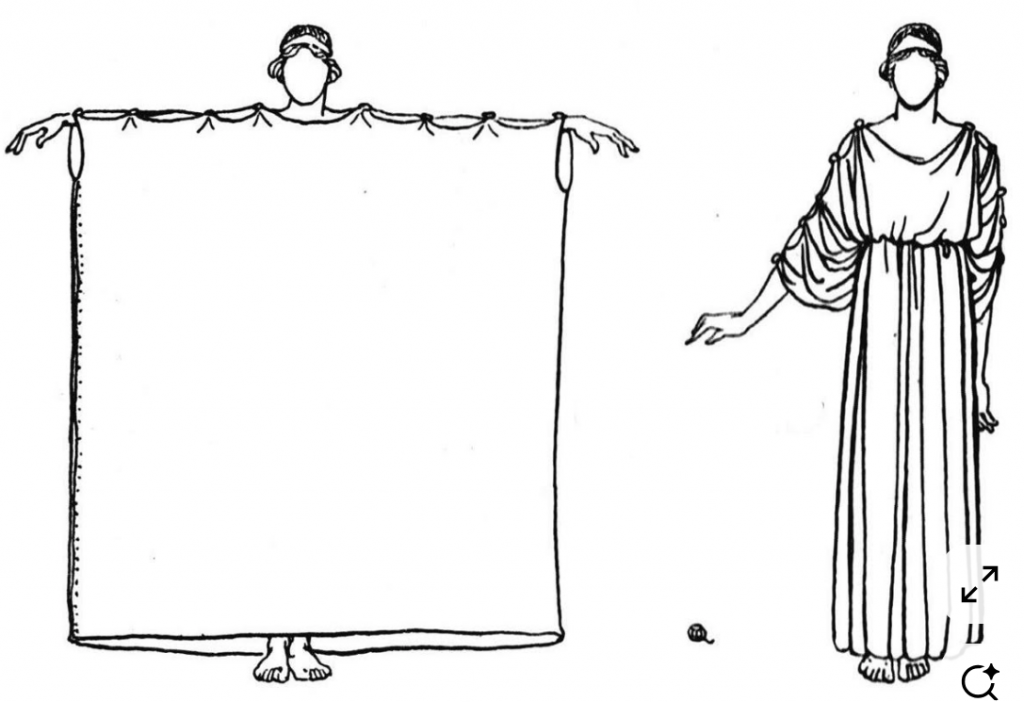
This has two panels: front and back, hence twice the minimum fabric.
Dimensions: Width of the back panel: from wrist to wrist or forearm to forearm, across your outstretched arms. Width of the front panel: as above, plus the width of your own hand. Length of both panels: distance from your nose to your toes. Someone 165cm tall should be able to wear a 150cm wide fabric as the length nicely, but 140cm wide fabric will run a bit short, and less than that will not be tall enough.
Assembly: sew the front and back panels, up both sides, inside out, stopping about three hands-widths from the top, to leave arm-holes. Turn in the right way. Fasten 3-6 buttons along the top on each side, working inwards from the edges, leaving a gap in the middle for your neck. The wider front panel will then have some extra in the middle, compared to the back. This extra forms the neck hole. Finish the hem. If you have a selvedge, use it on the top edge, because hemming that then adding the buttons is a pain. Experiment with the position of the buttons so that two sit directly over your bra straps to conceal them. You can also sew the fabric together a little more than the button strictly calls for in that spot.
To wear: put a belt over the top, and adjust the gathers that form to be somewhat even.
Roman Chiton variant 2: needs 2 x minimum fabric
Like variant 1, but stitch up the top shoulder seams instead of using buttons.
Roman Chiton variant 3: needs 2 x minimum fabric
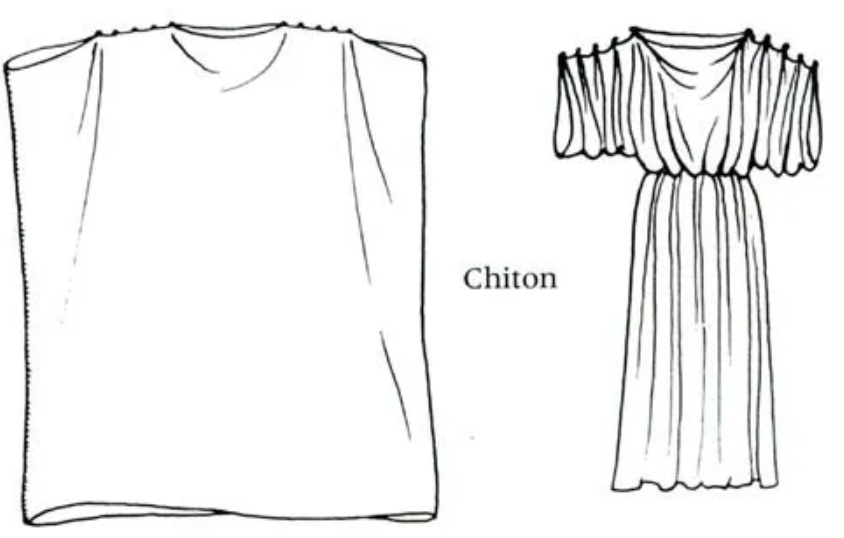
Like variant 1, but sew all the way up the sides. Leave a gap at the end of the button sequence and put your arms through there.
Peplos variant 1: needs 1 x minimum fabric
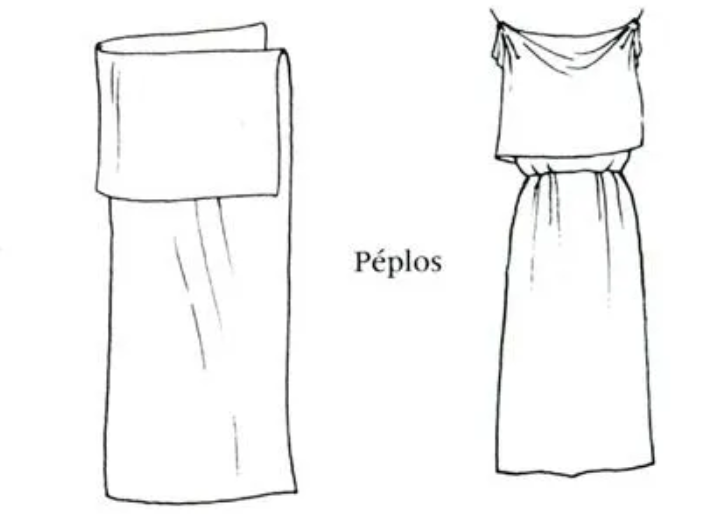
This variant has a folded top edge. The end of the fold can go down to below the bust, or near the waist, or even past the waist and under the belt. Your head goes through the middle gap at the top, your arms through the gap at each side at the top.
Assembly: sew your cloth into a tube that’s about 1.5m long by 1m wide . Fold top down and pin back to front, through the fold, at shoulder-width apart. Pin at the fold. Small kilt pins work well for this. For ease, although less authentic, you could put a permanent button in place of the pins. Put a belt over the top to gather it.
Peplos variant 2: needs 1 x minimum fabric
Like variant 1, but without the fold at the top.
You can wear this peplos on its own, but beware of your breasts showing through the armholes. A discreet safety pin can really help.
Men’s sleeveless tunic – 1 x or 2 x minimum fabric, depending on your build
Dimensions: Width of the back panel: from forearm to forearm or elbow to elbow, across your outstretched arms. Width of the front panel: as above, plus the width of your own hand. Length of both panels: your nose to your shins. Whether you but you can get away with two lots of 1.5m fabric depends on your build. If you are tall and narrow, cut your cloth into two 1.5n tall by 1m wide pieces. If you are short and narrow, the same, but shorten the length. If you are wide, you will just need more material.
Assembly: Just like the women’s chiton variant 2, i.e., sew the front and back panel together, up both sides, inside out. Stop about three hands-widths from the top, to leave arm-holes. Sew the top shoulder seam together inwards from the edge, leaving a gap at the middle for your head to go through. The wider front panel will then have some extra in the middle, compared to the back. This extra forms the neck hole. Turn in the right way. Finish the hem.
If you are struggling to get enough width from your cloth but have enough length, consider cropping off the extra length to make a sleeved garment, as per the Unisex and Undergarments section.
Men’s Leg coverings
Nothing in warm weather. Simple trousers in cold weather, or if you were an unsophisticated provincial.
Sleeved Unisex Tunic and Undergarments
Like a man’s tunic, but with a short wide sleeve added – about 4 hand’s widths wide and also this long. Do not try fit this sleeve to the arm like a modern sleeve. Because it is a simple tube, it needs to be baggy, or else it will bunch in a nasty way at the armpit. This could be an under-garment, or a lower-class over-garment.
Greek Chiton, wrapped
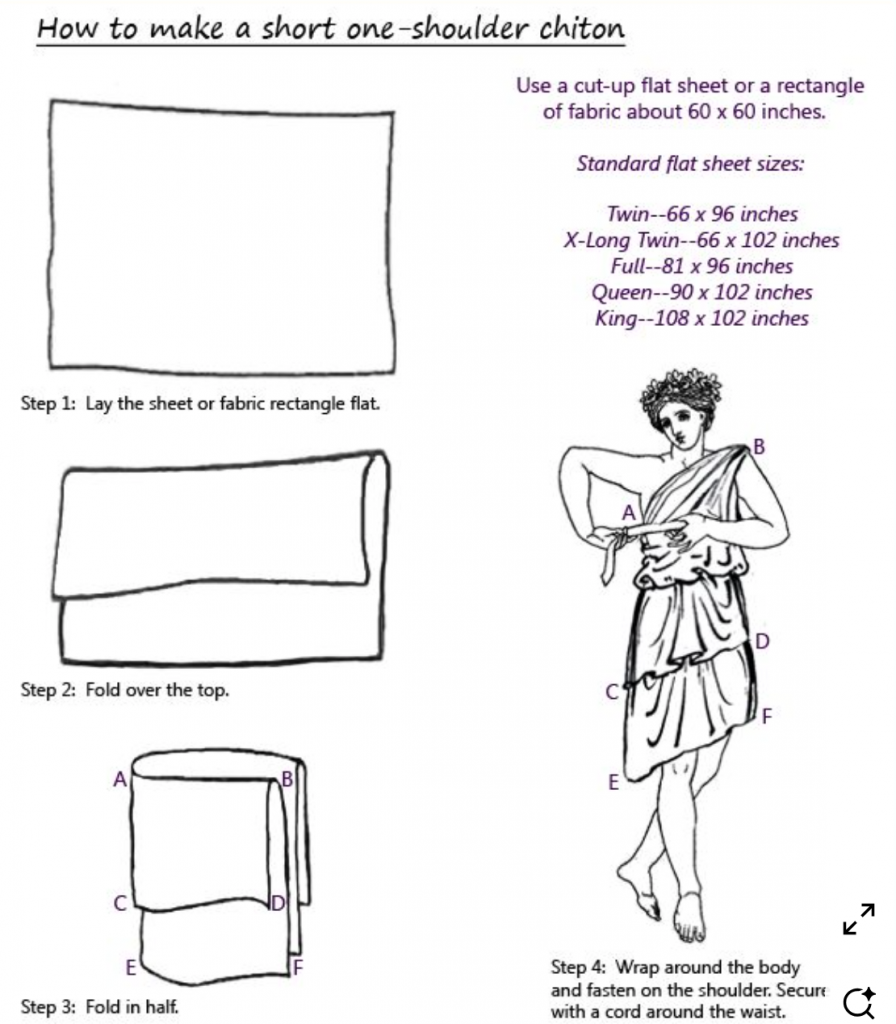
Similar to the Roman chiton, but without seams! Even less sewing, but has the potential for your clothes to slip or fall off.
The picture is of a man’s style. Women’s style is similar, but longer. A strong suggestion that women don’t wear this on its own, as the breast on the downwards side could very well end up uncovered.
Peplos, wrapped
You can overlap the edge instead of sewing it shut, and wear the peplos relying on just the pins and belt to close it. This is not such a good idea as an only-layer garment. But it can be good if you want to take your peplos off and use it as a blanket.
What about a Toga?
We’re not going there. Togas were about eight metres of cloth in one garment. They needed servants to put on, as they were wrapped a very specific way. They require practice and a sedentary lifestyle to wear. Not practical for SCA events.
More information
This is far from all there is to know about Roman clothing. The goal here is to get you dressed and going without much drama. However, you may also like to look at these sites:
- Easy Intro to ancient Roman Clothing on SCA Everyday
- Roman garb basics on Anna’s Rome
- Intro to Roman Clothing on Romana Sum (PDF)
(links were valid in late 2025)